Animation Settings
Role of Data
Animations are the data that can be played for visual representations for when enemies attack in the Battle Screen and things on the Map Screen. These are created by placing image patterns (cells) in a "Frame".
Parameter Details
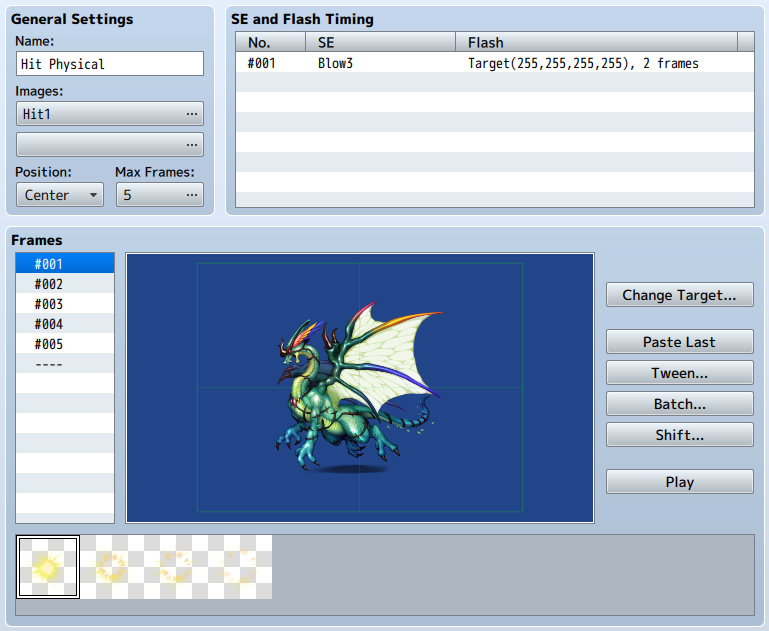
General Settings
Name
The name of the animation. This property is just used in the editor (does not affect the game).
Images
Image files used for creating animations (up to two images). Specify the file you want to use in the [Select an Image] window that is displayed when you press either button. When doing so, you can change the hue of the image by adjusting the [Hue] slider and use the adjusted image. The pattern image will be displayed in the [Pattern Palette] when you specify a file.
Position
Specify the position where the animation will be displayed. By selecting [Head], [Center] or [Feet], the top, center, and bottom of each character will be used. The animation will be displayed on the entire screen if this is set to [Screen]. Moreover, this animation when set to a skill or item that has an effect that affects multiple characters, it will be displayed for each character when the animation's position is set to [Head], [Center] or [Feet].
Max Frames
The overall frame count (1 to 200) for an animation. Specify this number in the window that appears when pressing the button. The number specified here will appear in the frame list. When you lower the frame count, those frames whose numbers exceed that amount will be deleted.
SE and Flash Timing
Sets the timing of when to play the sound effect and the screen flash during the animation. In the [SE and Flash Timing] window that is displayed when you double-click any row (a blank row when creating a new entry) in the list, you can specify the contents below.
A menu will appear if you right-click an item in the list where you can perform actions such as [Edit], [Cut], [Copy] and [Delete].
- Frames
- Specify the frame number where the sound effect and flash will be played.
- SE
- Specify the sound effect that will play.
- Flash
- Specify details for when the flash is played. Select [Target] to make a character flash, [Screen] to make the entire screen flash. You can specify the color of the flash by adjusting the [Red], [Green] and [Blue] values, and its intensity by increasing and decreasing its [Strength] (between 0 and 255). [Duration] is set to play for the number of frames (1 to 200). [Hide Target] causes the character to disappear temporarily, and you use this when you want to hide the character during the animation.
Frames
Frame List
List of frames in the animation. The frame number that you click becomes the frame that you will edit, and its contents will be displayed in the Frame View. By clicking the [Back] and [Next] buttons at the top and bottom of the list, you can change to the previous or next frame to edit. Additionally, using the menu that is displayed when right-clicking the frame number, you can [Copy], [Paste], [Clear], [Insert] and Delete frames.
Frame View
Contents of the frame. Set what is displayed by placing the images in the Pattern Palette as [Cells]. The green rectangle is the area that is displayed in the game window.
Please view [Controlling the Frame View] mentioned later to learn how to edit.
Change Target
Change the image of the enemy displayed in the Frame View. This property is just used in the editor (does not affect the game).
Paste Last
Changes the currently selected frame to be the same as the previous one.
Tween
Frame cells will be automatically created based on the two frames that were specified. Enter in the range for the frames and cells to be tweened, and check the items to tween using the boxes available and click [OK]. For example, by placing the cell in frame 1 to the left side, and placing it on the right in frame 10 and tweening the position between frames 1 and 10, the cells in frames 2 to 9 will be automatically animated to appear to be moving from left to right.
Batch
Set the cells to be the same in the specified frame range. Specify the frame and cell range in the [Frame] and [Cell] fields, select the items to be set and select the values for each item.
Shift
Shift the position of multiple cells placed in the specified frame.
Play
The animation which you are currently making will be played when pressing the Play button.
Pattern Palette
Displays the pattern images contained the file that was specified in the [Images] section. When clicked, the pattern will be the one to be placed in the frame. Treating the pattern in the upper left of the palette as #1, numbers (pattern number) for the other patterns will be assigned in order from left to right.
Controlling the Frame View
Placing Cells
Choose the image to be placed in the frame using the [Pattern Palette], and double click an empty spot in the Frame Edit Area. After doing so, that image will be placed in the prepared cell. It is possible to place up to 16 cells in 1 frame.
Display
The frame and number will be displayed in the cell. A white frame means that the cell is currently selected. The number is the priority order of the cell, and larger cells will be displayed towards the front.
Selecting a Cell to Edit
Clicking a cell will cause its frame to become white and will be selected to be edited. Smaller cells with the same number as other cells can be selected by clicking them while holding the [Shift] key.
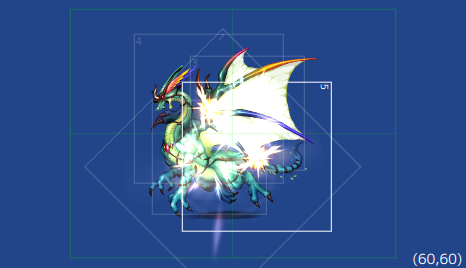
Moving Cells
Drag cells to move them. The position of cells currently selected will be displayed as coordinates in the bottom right of the Frame Edit Area. Assuming the coordinates in the center of the image are (0,0), X coordinates are displayed using values (-408 to 408) and Y coordinates are displayed using values (-312 to 312).
Controls via the Context Menu
By right-clicking a cell, a menu will be displayed where you can perform the following actions. You can open the [Cell Settings] window by also double-clicking.
▼Context Menu Items
- New
- Place a new cell.
- Edit
- Open the Cell Settings window.
- Cut
- Copy the currently selected cell to the clipboard and delete it.
- Copy
- Copy the currently selected cell to the clipboard.
- Paste
- Place the cell currently in the clipboard.
- Delete
- Delete the currently selected cell.
- Undo
- Cancel the most previous action, and return to the previous state prior to performing the action. It is possible to undo up to 20 actions.
- Redo
- Return the state back to what it was before pressing Undo.
- To Upper/To Lower
- Change the priority of displaying the cells (front/back).
▼Cell Setting Window Contents
- Pattern
- The pattern number. Changing the number will change it to the corresponding cell.
- X/Y
- Display position of the cell. X coordinates can be set from -408 to 408, and Y coordinates can be set from -312 to 312.
- Scale
- Changes the display magnification of the cell. The scale of the cell can be changed from 20 to 800% with the original image being 100%.
- Rotation
- The rotation (1 to 360 degrees) of the cell when displayed. Cells will be rotated clockwise using the specified degree of rotation.
- Mirror
- Setting this to [Yes] will flip the display of the cell's pattern.
- Opacity
- The opacity (0 to 255) of the cell. The smaller the value, the more opaque the cell will be, and will not be visible when set to 0.
- Blend
- Allows you to blend the hue of two cells that overlap. [Normal] will have it be displayed normally, and [Additive] will cause it to be whiter.